After spending some time looking for wireframing and prototyping softwares and tutorials, i realized that Inkscape is the best, fastest and easiest one. So here is a little tutorial on how i use it.
The only problem for me is that the text tool doesn't support underline and justification yet, but it will be done in this Google Summer of Code 2007 project. And running it in X11 on the Mac isn't so nice too, but there are also people working on this.
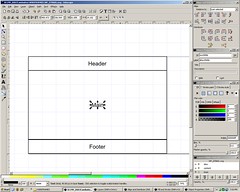
Opening inkscape will show you a blank page (portrait oriented). Go to File > Document Properties:
1 Adjusting the Document Properties
1.1 the Page tab:
- Default Units: px (pixels)
- Background: Double-click on the Background color, set the RGBA to ffffffff to have an white background when exporting the bitmap
- Size: Lets make 3 pages of a 1000x700 px site, with 100px between the pages, so the Width=3200px and Height=700px
1.2 Grid/Guides:
- check the Show grid box
- Units=px , Origin (xy)=0 , Spacing(xy)=10 , major grid line every 10 lines
1.3 Snap:
- this will depend on you, i use to change this many times during the work.
2 Layers
I tend to use only 3 layers: slice, content and basic (desc. order).
- basic: the skeleton that will appear on all pages, like header and footer (see item 3 - cloning)
- content: the lorem ipsum, images etc (see item 4)
- slice: just transparent rectangles to export the PNGs easily (see item 5)
3 Cloning (Header, Footer, ...)
Inkscape doesn't (yet) has master pages like inDesign, but you can tweak this using the cloning feature.
- Select the objects you want to clone, group them (ctrl+g)
- With the group selected, give it a nice name (right-click:Object Properties), Id: basicframe and Label:#basicframe
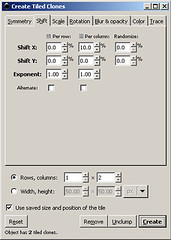
- Now go to Edit / Clone / Create Tiled Clones
- Go to the second tab (Shift) and set the spacing you want. Since we have 1000px width and decided 100px between pages, select 10% on the Shit X Per Column.
- We want 2 adicional pages, so select Rows, columns: 1, 2. And click Create.
Now one of the clones, is under the original (already selected), so just move the original down (shift+downarrow), select the clone and move it to the right. Down forget to upper the original again.
Also give the clones nice names (right-click:Object Properties) like basicframe_clone1 and basicframe_clone2

Observation: if you want to add more things to the clone (ex: an rectangle on the header), just create it and move this object (yes, with the mouse) into the group using the XML Editor (ctrl+shift+X).
Now lock the basic layer (on the Layers Window - ctrl+shift+L) to prevent accidents. Everytime you need to change something there, unlock, change and lock again.
You can download this basic wireframe template here (right-click and save as...)
4 Filling the wireframe
With the basic layer locked, select the content layer and make your stuff there: add buttons, lorem ipsums, lines etc.
5 Exporting to PNG with the Slice layer
This slice trick i learned on this youtube tutorial: Slice Web Page Layout (higher quality video here) by heathenx:
- Go to the slice layer
- create an rectangle on top of one of your pages
- name it nicely (ex: index, search, register) with the 'right-click:Object Properties'
- make it transparent: 'right-click: Fill and Stroke'. Stroke:None and Fill:alpha=0
- click on the rectangle, and then Edit/Export Bitmap
- select the resolution and voila!
Other tips:
Images
Don't vectorize your images, just drag'n'drop the image (jpg, png) inside the file and if you are going to switch computers, edit the XML to the relative path: images/photo1.png
Custom your Color Palette
This is a very important time saver. The default palette, on the footer of inkscape has too many colors. You can use the palettes presented like the "Websave22" (just click on the arrow on the right side of the palette) or make your own with GIMP (check this tutorial on the Custom Swatches or Palette).